Introduction
Tables represent an invaluable item in any technical communicator's toolset. They have an obvious role in presenting large quantities of structured data such as specifications or command references. But tables are also often a great alternative to lists or freeform text because they provide ways of avoiding repeated phrases, highlighting key information, making patterns more obvious, and enabling comparisons.
The challenges of tables in HTML
A single table is often comprised of as many as eight different HTML elements such as table, col, thead, tr, th and td. This creates a challenge when trying to set up specific table "styles" to ensure consistency in format between tables of the same type. In theory, you could do this by creating named classes for each of the different elements of a table (table, col, thead, etc.) and then applying the appropriate class name to each of the table elements individually - but this would be painstaking work.
A more efficient alternative is to apply a class to the top-level table element only, and then use Descendant Selectors (one of my favourite features of CSS) to set the formatting for all the other elements that are nested within it. I described this approach in a conference presentation on creating table styles in CSS.
MadCap Flare's approach
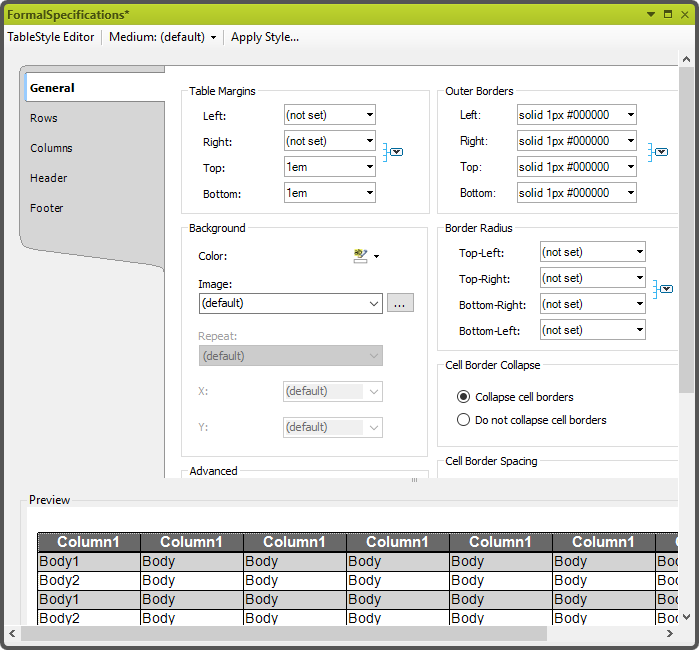
Instead of dealing with all the elements of a table within your project's main style sheet, Flare separates these off into dedicated style sheets called "table styles". These are actually perfectly standard CSS files; but they contain only the HTML elements for tables, and have their own special TableStyle Editor within the Flare user interface. This editor makes it easy to design the overall format of a table without needing to be aware of all of the individual HTML elements, and it provides a useful preview of the resulting appearance as shown in this screenshot.

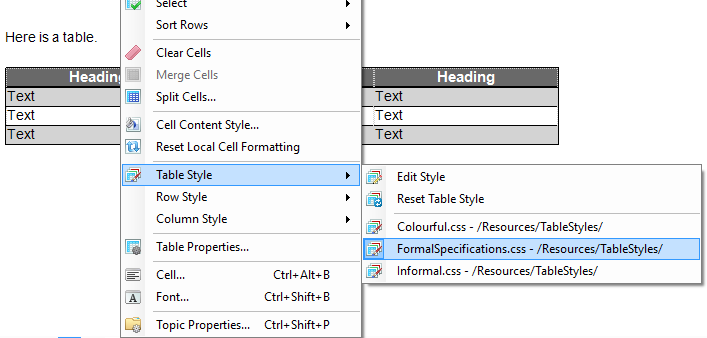
You can create a separate table style for each of the different table formats that you need, and then easily apply the appropriate table style to each table from the right-click context menu (see the screenshot below). Flare takes care of all the complex HTML coding for you.

Tables not for layout
In the rest of this article, I'll provide some tips that I have found useful when working on tables within Flare. But before I go any further, I should mention that tables are not recommended as a way of achieving special layout effects in Flare, such as placing a section of text alongside an image. For these effects, you should make use of Flare's support for the floating and absolute positioning of elements in a topic (see bit.ly/1O6ZWHm).
Apply a table style to multiple topics
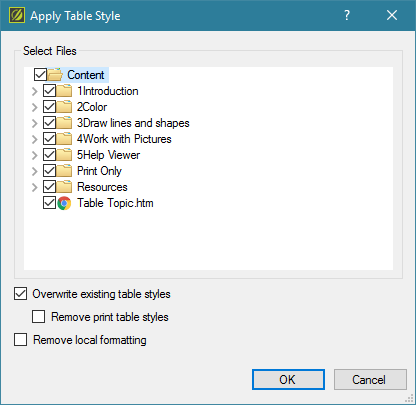
After creating a table style, you may sometimes need to apply the new style to tables in multiple topics, or even to all the tables throughout your project. You can do this quickly and easily by clicking the Apply button at the top of the TableStyle Editor. Flare then enables you to select multiple folders and topics (see screenshot below), and automatically applies the current Table Style to all the tables within the selected items. This is a great time-saver.

Set table widths in your project's main style sheet
Strangely, there is no way to specify the width of a table (either as an absolute measurement or as a percentage of the parent container) within a table style. However, you can ensure that all tables with a specific table style have the same width by adding a style rule to your project's main style sheet. As an example, here is a rule that sets the width of all tables with a table style of "MyTable" to 75% of the window
table.TableStyle-MyTable
			{
			   width: 75% !important;
			}
As a result of the !important keyword, this rule overrides (for HTML-based output) the widths specified for each table within the Table Properties of each individual table. However, for PDF output the rule only takes effect if you select the "Autofit to contents" option within the Table Properties for each table.
Use percentages for column widths
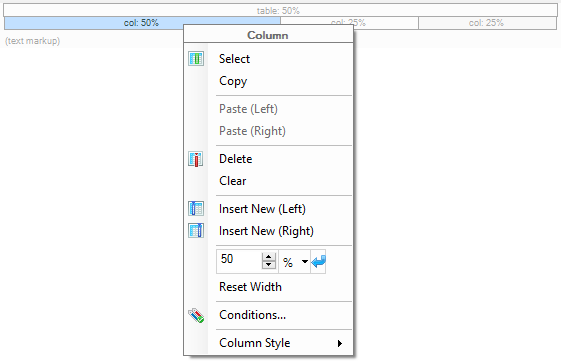
I recommend specifying the column widths of each individual table as percentages rather than absolute measurements, as in the screenshot below.

Note that this means you should not drag the column borders to resize them because doing so causes the column width to be set in pixels. The advantage of using percentages is that the columns resize automatically based on the width of the overall table, which gives you a more responsive layout.
Use row and column styles
Sometimes it is useful to highlight specific rows or columns in a table, perhaps by using a distinctive coloured background. Rather than apply local inline formatting, I recommend using custom row or column styles. You create a custom row or column style in the TableStyle Editor by adding a new style, and changing the type from the default setting of "Pattern" to "Custom". Then set the formatting properties that you would like for the new style. To apply a custom style, simply right-click in a table and select one of the available Row Styles or Column Styles, as required.
Creating a style for the first column
Sometimes I need the first column of a table to be formatted distinctively (in the same way as I normally want the header row to be different from other rows). Unfortunately, there is no such thing as a "Header Column" in the TableStyle Editor, but the workaround is to create two different column styles of the "Pattern" type. Set the first column style to repeat once, and the other column style to repeat 100 times (the maximum that Flare allows). Flare will then use your first column style for the first column, and the other column style for all remaining columns
Further information in Flare's Help
As you will have gathered from this article, Flare provides a rich set of tools and features for working with tables. You can find out more by reading MadCap's Table Guide, which is published in PDF format here bit.ly/1OGtDk6.
![]()
Training and Consulting in MadCap Flare
UA Europe provides specialist consulting and training (either face-to-face or via the Web) in MadCap Flare.

