Introduction
Most Flare authors will need at one time or another to import content from Microsoft Word into Flare. I am asked about this issue more frequently, perhaps, than any other aspect of Flare. There are two main scenarios that may require you to import from Word: the first is that you have legacy content (perhaps a previous manual that was written in Word) that you need to convert to Flare. In this case, it will be a one-off import and you will be discarding the Word document following the successful conversion. The alternative scenario is that a subject matter expert is creating and maintaining content in Word format that you will import and link to your Flare project. In this scenario, you will want to repeat the import process each time there is a change to the Word document, and the corresponding topics in Flare will be updated. This article describes the import process in more detail, and explains the important differences between the ways in which you should carry out the import for each of these two scenarios.
How does the import process work?
The process of importing Word documents into Flare is controlled by a special XML (.flimp) file within the Flare project. This file is called an MS Word Import file, and you can create it either by using the Word Import Wizard (Project > Import > MS Word Documents) or simply by adding a new MS Word Import file to your project and configuring it using the Word Import Editor. This file specifies the names and locations of the Word document(s) to be imported, and various settings that control how the incoming Word document is segmented into topics and styled. After completing the Word import process, in the case of scenario 1 (one-off import) you would have no further use for the Word Import file and you could delete it. For scenario 2, it is important to retain the MS Word Import file because it will be required each time you need to refresh the topics in Flare with updated content in the Word document.
Preparing the Word document
Ideally the Word document should be well styled and should not rely on manually-applied inline formatting. If there is a lot of manually-applied inline formatting, you may wish to take the time within Word to replace this with a simple set of semantically-named paragraph and character styles. The formatting that you associate with these styles is unimportant, since you will be mapping the styles to the corresponding styles within your Flare stylesheet during the import process. Alternatively, you may decide that it is easier to allow the inline formatting to be removed by the import process (select Don’t Preserve MS Word Styles) and then apply the appropriate paragraph and character styles using Flare’s XML Editor.
You should also look out for empty paragraphs – I don’t want these to come into Flare since I will be controlling white space through the use of top- and bottom margin properties. In particular, watch out for empty paragraphs that have heading styles applied, as these will result in new topics in Flare. To quickly remove all empty paragraphs, search and replace ^p^p with ^p, and repeat until no more replacements are made.
The Word document should also be divided into "topic-sized" sections by headings. Remove any manual page breaks that may have been applied (since Flare will treat these as topic breaks), and also remove heading numbering since this will be imported in to Flare as "hard-coded" numbers. You should be able to do this quickly and easily by modifying the heading styles. Don't forget also to update the table of contents (if there is one) to remove the numbers from there too.
Configuring the MS Word Import file
There is some debate about the optimum settings to use, and the recommendations I make for a small selection of the most important settings in Table 1 below reflect my own personal preferences.
| Tab | Setting | Recommendation |
|---|---|---|
| Source Files | Link Generated Files to Source Files | Select this option only for scenario 2 where the content will continue to be updated in Word. As a result of selecting this option, Flare will display a warning message each time you attempt to edit any of the imported topics. This is to avoid changes in Flare being over-written by re-importing from Word. |
| New Topic Styles | New Topic Styles | Select heading styles (Heading 1, Heading 2, etc.) to break the document into short, self-contained topics. The level of heading that you need to go down to depends on the size and depth of the source document. |
| Options | Autoreimport before Generate Output | Select this option only in scenario 2 when you have linked the generated files to the source files. Flare then checks for changes to the original Word document each time you build a target, and re-imports the entire document if it finds any. Be aware that any edits you have made to the corresponding topics within Flare are over-written without warning. |
| Stylesheet | Source Styles | I always select Don’t Preserve MS Word Styles. This strips out any manually-applied formatting and enables me to map the Word styles to the styles in my Flare Stylesheet (which I select from the drop-down list on this tab). In scenario 2, if the Word document is heavily reliant on manually-applied formatting and you are not planning to edit the topics in Flare, then you may choose to select Preserve MS Word Styles. |
| Paragraph styles | It is not possible to map Word’s list styles to Flare’s list styles, so I leave these unmapped. This results in the bullets and numbering being preserved. I describe how to deal with the imported lists in the next section. |
Dealing with multi-level lists
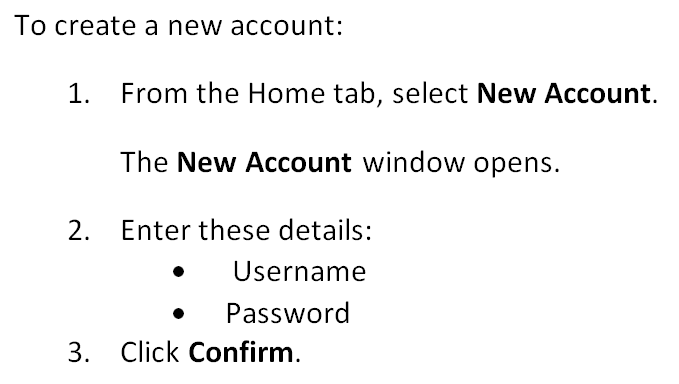
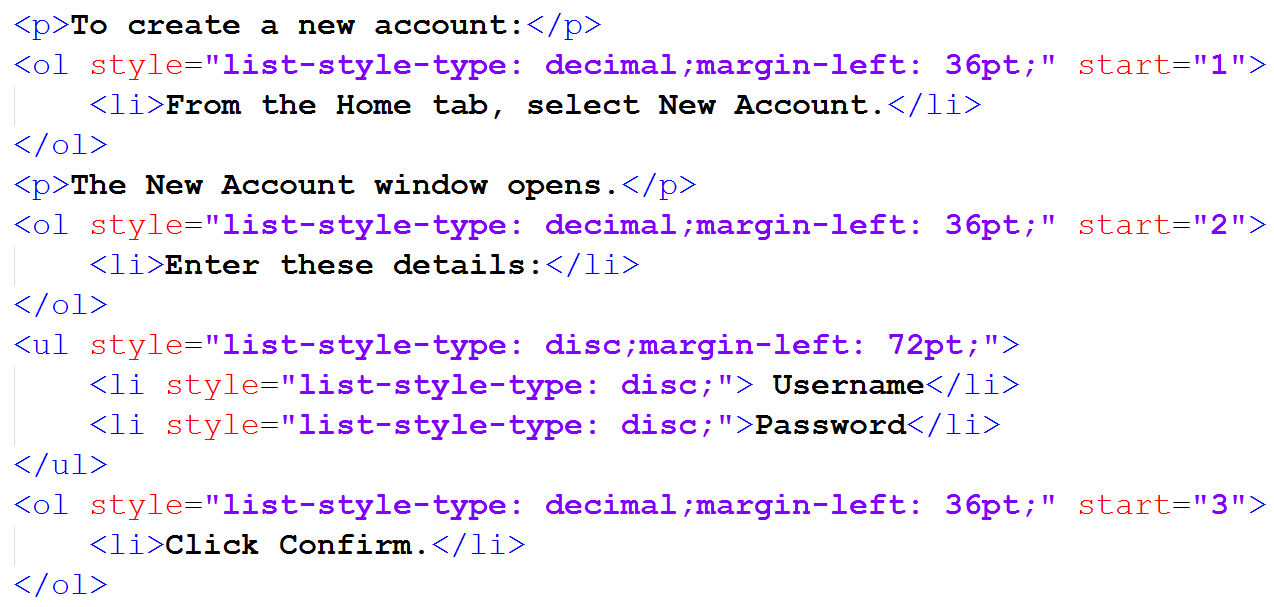
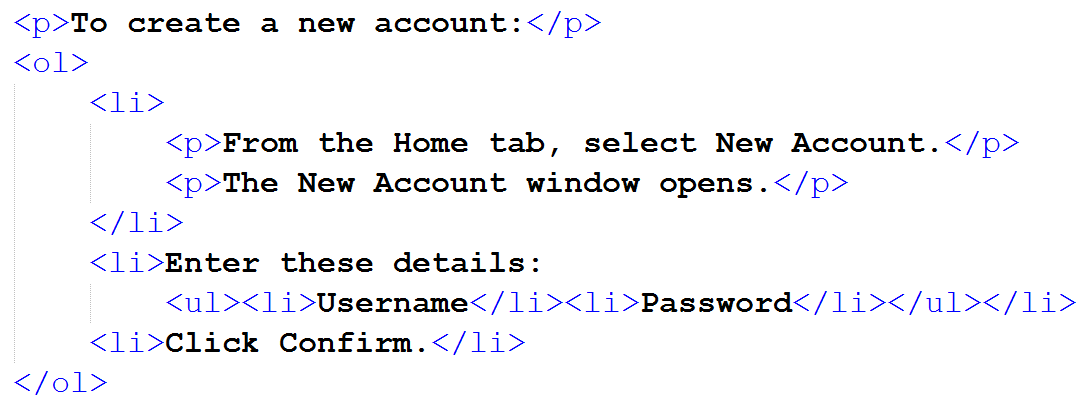
Multi-level lists are very common in technical documentation and, in my experience, are the most significant cause of additional work when migrating from a Word document to well-structured Flare topics. You may find that the lists look superficially OK after import into Flare. However, on closer inspection of the source code you will find the hierarchy has been achieved through the use of cosmetic formatting and that the items have not been correctly nested. The best solution, in my view, is to remove as much formatting as possible during the import process and then restructure the lists manually in Flare. As an illustration of this issue, the first screenshot below shows a typical multi-level list within Word, the second shows the source code after import into Flare, and the third shows the cleaned-up source code after I have restructured it.


While restructuring lists in Flare’s XML Editor, I have found the following techniques to be particularly useful:
- To create multiple paragraphs within a list item, right-click the tag bar for the list item and select Make Paragraph Item(s).
- To nest one or more list item(s) within the list item above, select the list item(s) and press <Tab>.
- To promote or more list item(s) to a higher level within the list, select the list item(s) and press <Shift>+<Tab>.
- To merge two consecutive lists into one (so that the numbering is continuous), right click the span bar of the second list (ol or ul) and select Merge with Previous List.
I recommend that you handle the presentation of your multi-level lists (choice of bullets/numbering scheme, indent, spacing, etc.) by using Complex Selectors, which enable you to choose the required format of each level of nesting.
Images
There are a number of image issues to be aware of:
- Positioning: images that have been positioned in front of or behind text in Word are likely to appear in the wrong position within Flare. It is better to ensure that all images are positioned in line before import.
- Cropping: some authors choose to crop their images within Word, for example to remove irrelevant or distracting content from screenshots. During the import process, these images are added to the Flare project in their original uncropped state, but are displayed within topics using the dimensions of the cropped version in Word. This results in distortion of the image.
- Annotations and callouts: any shapes such as arrows and callouts that are added to images in Word will be stripped out during import. You could use a product such as SnagIt to add the annotations and callouts to the image itself before import, but perhaps a better idea is to add them using MadCap Capture (which is bundled for free with Flare) after completing the import.
Checklist for post-import clean-up
- Re-structure lists using the techniques describe in the Multi-level lists section above.
- Delete any extraneous and unwanted
files that may have been added to your
project by the Word Import process. Examples are:
- Style sheet: even if you have chosen not to preserve your Word styles, Flare adds a new stylesheet to your project (I’m not really sure why). As long as you have specified a Master Stylesheet for your project, this newly imported stylesheet is redundant and can be safely deleted.
- TOC: this contains the imported topics. You will probably want to add these directly to your Master TOC and to any other TOCs you are using, and there is no need to keep the imported TOC.
- Master page
- Check all tables, and if necessary:
- Add a header row.
- Apply an appropriate table style.
- Remove duplicate heading rows that were repeated after page breaks in the original file.
- Check for missing or corrupted formatting within the tables.
![]()
Training and Consulting in MadCap Flare
UA Europe provides specialist consulting and training (either face-to-face or via the Web) in MadCap Flare.

