
Introduction
Like Adobe Captivate and TechSmith Camtasia, MadCap Mimic records screen activity and publishes it as a video that you can incorporate in your user assistance. At time of writing, it is about to celebrate its tenth birthday (version 1 was released on 29th January, 2007) so I thought it was due some more coverage in my regular Communicator column. I’m going to focus on ‘keyframes’, a very important feature that was introduced in the latest version of the product released in 2016.
Background on Mimic
Before I get into keyframes specifically, let’s talk a little more about the fundamental principles of MadCap Mimic. Like Captivate, it enables you to record screen activity as a series of individual ‘frames’ that represent moments when the screen changed (for example, a new dialog box opened).
During the edit phase, you assign durations to each of the frames and can add objects such as arrows, text boxes, and mouse cursors. You can also specify movement and changes of states within the frame (more about that later). Although a frame is represented as a static screenshot in the editor, each frame has its own timeline and will actually be transformed into a tiny video at publishing time.
The publishing process then assembles all these tiny videos to create a continuous full-motion movie showing all the screen activity from start to finish.
The advantage of the frame-based approach is that it makes movies easier to update and localise. For example, you can replace the background images of all the frames with localised screenshots while retaining mouse movement, arrows, and other objects.
Mimic version 8
Mimic 8, the latest version of the application, was released in early 2016 after a two-year interval. It made some long overdue fixes to what had been (in my view) a rather unstable and difficult-to-use product in its earlier incarnations.
When Mimic originally came out it published to its own proprietary movie format, and also supported Flash (.swf). However, Mimic 8 dropped both of these formats in favour of the HTML5-compatible formats .mp4 and .webm. It also made welcome enhancements to the Frame Editor interface, and introduced ‘keyframes’, which enable you to create movement, transitions, and animation effects during playback of the published movie. I have found myself relying on keyframes heavily during a recent project that involved producing a series of demonstration videos.
Focus on keyframes
Although powerful and very useful in MadCap Mimic, keyframes are a difficult concept to get to grips with, and it takes practice to use them successfully. So what are keyframes? A key frame in animation and filmmaking is a drawing that defines the starting and ending points of any smooth transition. For example, in a classic Tom and Jerry cartoon there might have been a key frame showing Tom the cat in his normal state, and then another showing him completely flattened by an anvil falling on his head (luckily, he’d be back to normal again in the next shot!).
In MadCap Mimic, keyframes indicate points on a frame’s timeline where an object has a specific state. If you set up two or more keyframes that have different states within a frame, then the object will transition from one state to another as the frame plays in the output.
Keyframes are extremely important as they provide the main way of adding animation, movement, and special effects within your frames. Even basic effects such as having a text box fade in and out, or the mouse cursor move to a menu option, are achieved using keyframes. Let’s look at these two examples in more detail.
Fading an object in and out
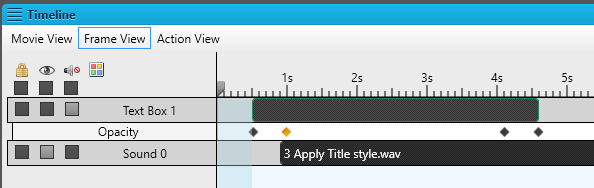
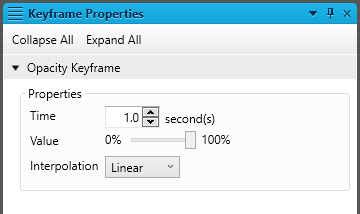
When I first started using Mimic 8, I was surprised not to find an equivalent of Adobe Captivate’s ‘Fade In’ and ‘Fade Out’ effects. But then I realised that you have to think of a fade-in effect as a smooth transition between two states: an opacity of 0% and an opacity of 100%. So to apply a half-second fade-in effect to a text box, I need to add two keyframes, spaced 0.5 second apart, with these two different values for the opacity. I also need to tell Mimic to use a smooth transition between the two states, and I can do that by setting the Interpolation field for each keyframe to Linear. I’ll do the same for the fade-out effect, adding a keyframe with an opacity of 100% followed 0.5 second later by a keyframe with an opacity of 0%.
This screenshot shows the result on the timeline of applying these keyframes to the text box. The keyframes are shown as small diamond shaped symbols beneath the bar representing the text box.
Here are the properties of the second keyframe:
Moving the mouse cursor
Using keyframes to move the mouse cursor is a little more complicated, and this time we’ll need to use keyframes that change the Position property of the object rather than the Opacity property.
Typically, I want the mouse to remain static for the first few moments of a frame (perhaps while the narration explains what is about to happen), and then I want it to follow a nice natural curved path to a new position (perhaps on top of a button or menu option). To do this, I’ll set up three keyframes, as shown in this screenshot:
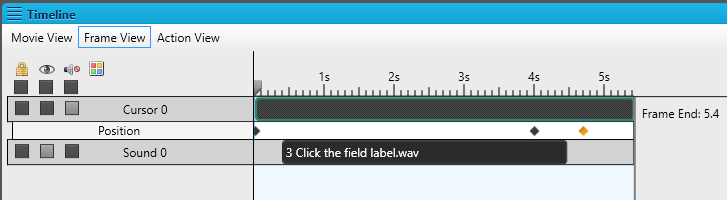
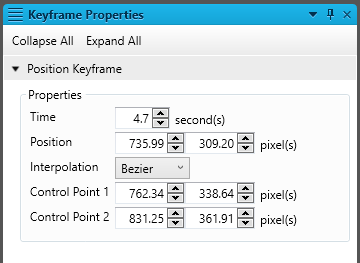
The first keyframe, at the start of the timeline, specifies the starting position of the cursor, and the next keyframe is at the point on the timeline where I want the movement to start. This second keyframe needs to have the same position settings as the first so that no movement takes place up to this point. I’ll place the third and final keyframe on the timeline where I want the movement to finish, and its settings will specify the new position of the cursor. This third keyframe will have its Interpolation set to Bezier, which tells Mimic to use a curved path to this position (see screenshot below).
Call to action
If you already have Mimic (perhaps as part of the MadPak Suite) but haven’t used it, why not give it a try? Videos are a great way to enhance your user assistance by making it more dynamic. If you’re already a Mimic user, then I recommend that you read all the available information about keyframes, and practise using them.
Further information
![]()
Training and Consulting in MadCap Flare
UA Europe provides specialist consulting and training (either face-to-face or via the Web) in MadCap Flare.