
HelpXplain is developed by Austrian-based EC Software. You may know the company from their long-standing product Help+Manual, which has been one of the most innovative and enduring Help Authoring Tools over the last twenty years. During that time, EC Software has been a single-product company, with the exception of their screen capture utility TNT Screen Capture, which was bundled with early versions of Help+Manual and sold as a separate product until 2011.
You may wonder why, after all that time, they have decided to create a brand-new product. The answer, I believe, is that there has been a long-standing need for a way of presenting step-by-step instructions in a more visual, dynamic, and interactive way that is not possible using a primarily text-based authoring tool like Help+Manual. The more visual output from HelpXplain complements nicely the output from Help+Manual, and indeed can easily be embedded within Help+Manual topics, thus providing the best of both worlds. This niche has previously been filled by screencasting tools such as RoboDemo, Adobe Captivate, and MadCap Mimic, but the current range of competing tools are relatively complex, with a steep learning curve — and many have an increasing focus on live video and eLearning that is arguably less appropriate to the needs of user assistance writers.
What is HelpXplain?
HelpXplain is effectively two tools in one: firstly, it enables you to create presentations and infographics (in a similar way to presentation tools like PowerPoint and Prezi). But you can also use it to record and create screencasts, consisting of a sequence of captured screens with mouse movement that simulates the completion of a task within a software application. For its current audience of technical writers, EC Software is emphasising the second of these use cases by using the strapline The tool for step-by-step instructions on its product website. However, some potential HelpXplain users may choose to use the product primarily as a substitute for PowerPoint or Prezi for creating dynamic presentations.
Why would you use HelpXplain rather than PowerPoint? Well, one possible answer is that it enables you to create fancier transitions and animations, arguably resulting in a more engaging presentation. But I think this misses the point: a key feature of HelpXplain is that you can easily add a hierarchical structure to your presentation by adding slides within slides — in this sense, HelpXplain has more in common with Prezi than PowerPoint. At presentation time, special transitions including zoom and pan can be used to make the multilevel structure more apparent. This can be useful for explaining difficult concepts or complex relationships, or for zooming in to greater details from the 'big picture'.
Personally, I will be making most use of HelpXplain's screencast capabilities, and I really appreciate the way that I can record and edit a simple demonstration video quickly and easily. In many ways, this aspect of the product reminds me of the clean simplicity of RoboDemo, the screencast product that Macromedia acquired in 2003, before it evolved into the eLearning behemoth that is Adobe Captivate today.
Underlying concepts of HelpXplain
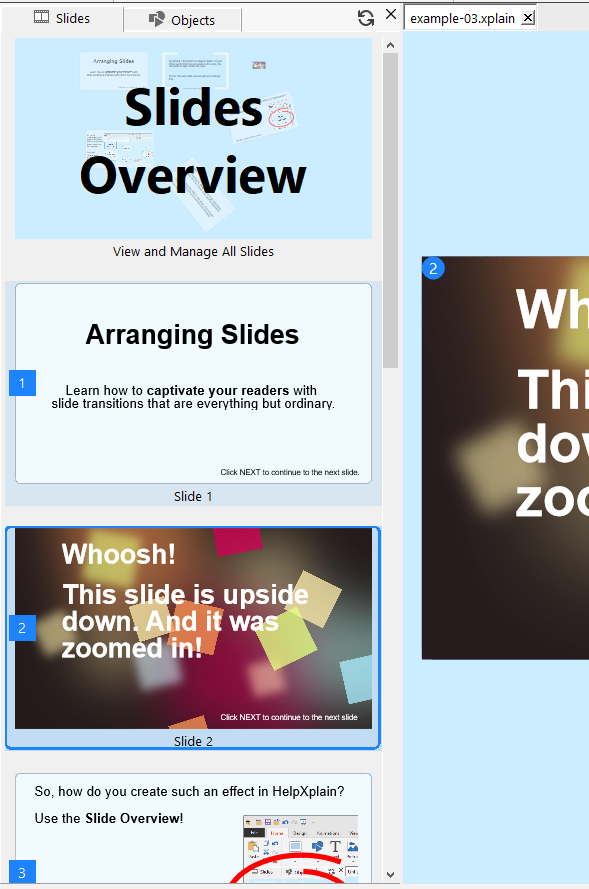
In common with PowerPoint, a HelpXplain project (or Xplain project, for short) consists of a collection of slides. These are shown in the Slides List, which defines the default order in which the slides are presented (see screenshot below). You can easily drag slides up and down the Slides List to change the order.
Where HelpXplain is more like Prezi, the slides are also arranged within a 'workspace', which is accessed from the Slides Overview at the top of the Slides List. This is a virtual space with no boundaries, as shown in the screenshot below.
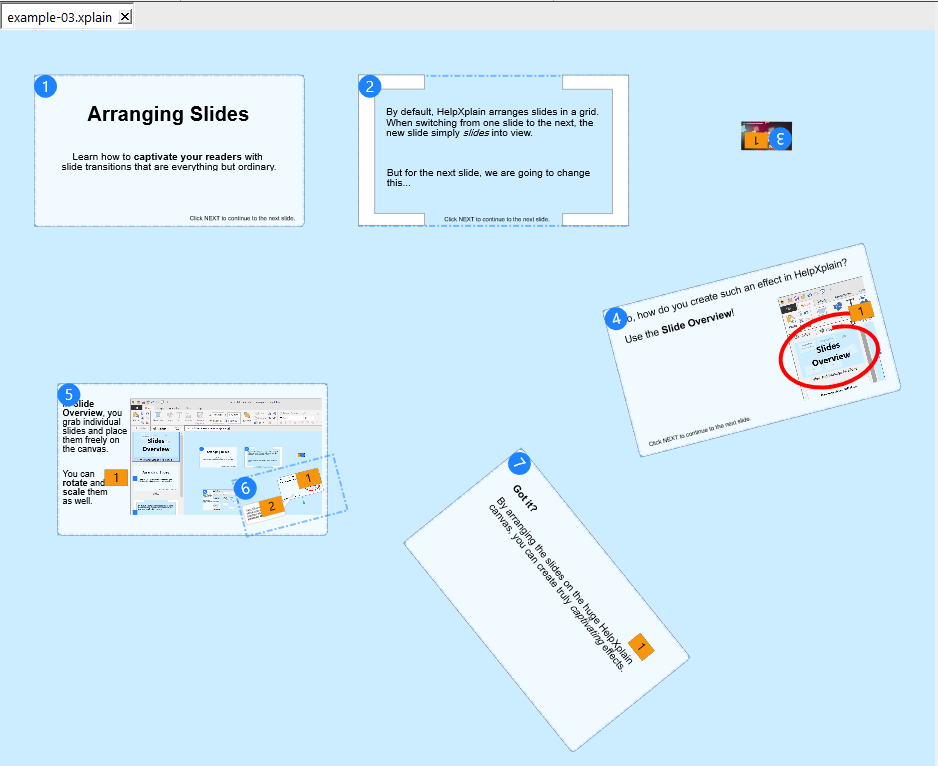
You can think of it as laying out printed copies of the slides on a large (potentially infinite) floor. The area of the workspace actually covered by the slides is called the 'canvas'. One of the main roles of the workspace is to define the slides' transitions — the position of each slide on the workspace relative to the next slide in the sequence defines the transition between the two slides. You can think of it as video camera mounted above the canvas pointing down at a single slide — during a transition, the camera moves across the canvas from one slide to the next, rotating if necessary.
But even if you are not taken with the idea of fancy transitions (I still remember some attendees at a UA Europe conference complaining of seasickness following a Prezi presentation), read on! The workspace can also be used to re-size slides and move smaller slides within larger slides. This does not actually change the physical dimensions of the slides, but determines the relative sizes of the slides for the purposes of transitions. And it also means that nested slides will show within the larger slide when it is displayed.
Here are a couple of examples of how this technique could be useful:
- You could create a sequence of four slides containing content, and create an empty slide before them in the Slides List. After clicking Slides Overview, you could then use the Workspace to enlarge the empty slide and move the four content slides within it. The large slide now contains a visual overview of the four other slides, and the initial transition would zoom in to the first of the content slides.
- You could create a slide containing a complex graphic or flowchart, and create four empty slides following it in the Slides List. Using the Workspace, you could make the four empty slides smaller, and move them over key areas of the slide containing the graphic (there is actually a more efficient way of doing this by inserting 'Zoom-in' slides). The presentation would show the full graphic before zooming in to each of the key areas in turn.
Slide objects, themes, and animations
There is a range of different objects that you can add to each slide, which include basic shapes, callouts, numbering tags, animated spotlights, arrows and symbols, and many useful marker icons. You can also insert images, as well as capturing and inserting screenshots (HelpXplain includes a top-notch screen capture utility). All of these objects can be re-sized, rotated, and aligned on the slides. You can set the colour, outline, and may other properties for each of the shape objects. To ensure consistency and save you time, each Xplain project has a 'Theme' that defines the default properties for each of the types of object, and you can edit this Theme and save it to match your own corporate style guidelines.
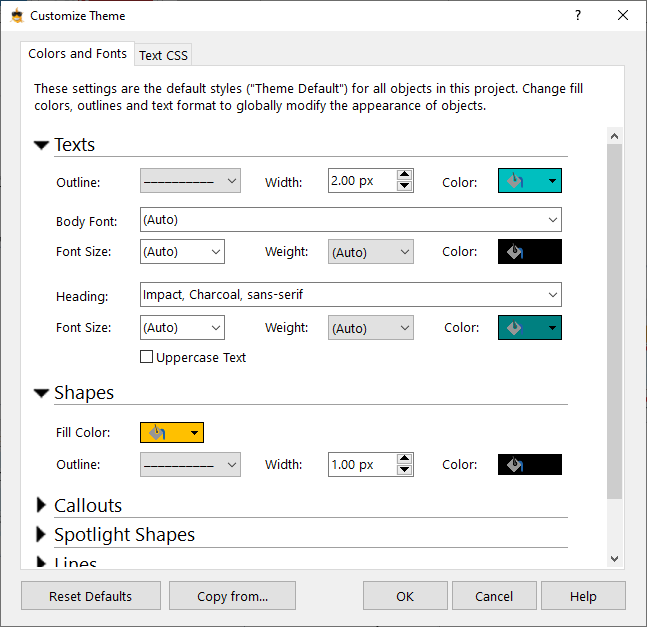
You can also copy a Theme from another Xplain project, so you don't need to set up your Theme from scratch each time you create a new project.
Finally, and importantly, HelpXplain supports a rich set of animation effects (including movement, zooming, and rotation) for each object on the slide, and you can define the sequence in which these animations take place. So, even within a single-slide infographic you could use object animations to build a picture, explain a concept, or show the sequence of a task.
Features of HelpXplain that support screencasts
So far, I haven't said much about the other main use of HelpXplain: creating screencasts such as 'Show Me Demos' or simulations of software. The key to this is that one of the supported objects is a Mouse Cursor, and this object has a range of associated special animations including Click, Move+Click, and Drag. There is also a Typewriter animation that makes the text within text boxes appear one character at a time, as if being typed.
Similar to Adobe Captivate, HelpXplain enables you to record a series of screenshots during a task, and each becomes a slide in the project. By adding movement and typing, and then showing each of the slides in sequence with autoplay, you can present a very convincing demonstration of the original task. Obviously, in this case you would want each slide to replace the previous without any transition effect, and there is an option for easily turning off all slide transitions. In this case, the workspace becomes irrelevant.
There is a very useful Preview Slideshow button on the toolbar, which enables you to quickly preview sections of your project without needing to publish the full output.
You can also add audio to slides, and this is extremely valuable for screencasts. It is my experience that users learn much more effectively if a video demonstration is accompanied by an audio narration.
I'm pleased to say that HelpXplain also enables you to stop autoplay on specific slides to await a user action. You can add hyperlinks to objects on the slide, enabling the user to make a choice about what they see next (or to test the user's knowledge by asking them to make the correct selection).
Project and source files
From a technical point of view, an Xplain project is a collection of standard image files along with a single XML-based project file that contains all the properties, slide metadata, relationships and settings associated with the project.
The files are all combined and compressed into a standard zip archive with a .xplain file extension. This is similar to how Help+Manual files can be compressed into a single .hmxz project file, which is actually a disguised zip archive. The output that you publish from an Xplain project is based on modern HTML5 and CSS3 animation and browser technology. A key point about this is that it does not use Flash (which is about to be discontinued), so it is compatible with all current platforms.
Steps for creating a screencast
The basic steps for creating a basic screencast, such as a simple 'Show Me Demo' might be as follows:
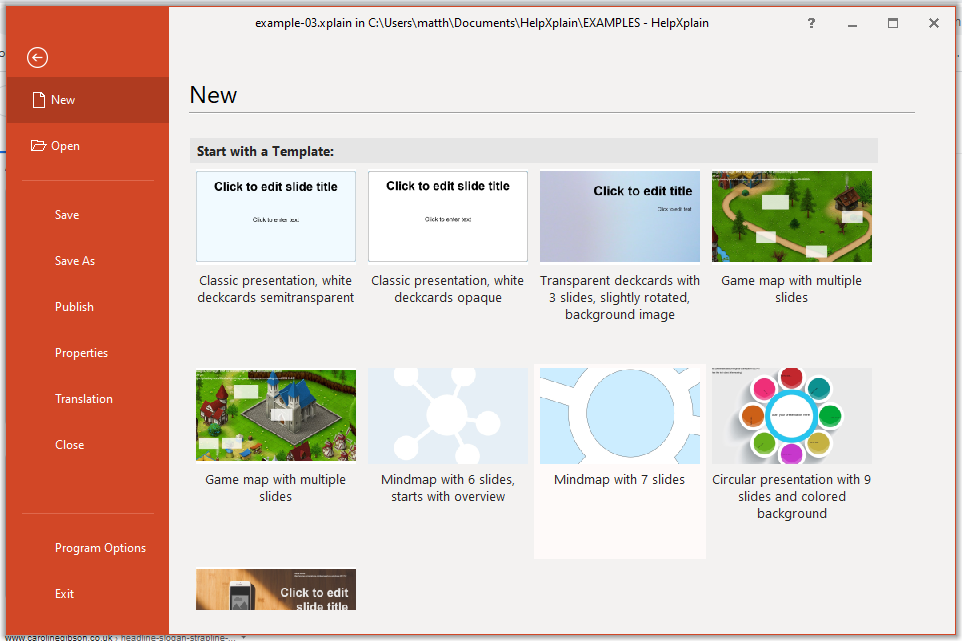
Create a new Xplain project from one of the supplied templates shown below, or by copying an existing Xplain project.
If you have started from one of the supplied templates, copy the customized Theme from another of your Xplain projects.
Record Screencast slides. I like the fact that the size of the recording area can easily be set to match either your last recording or the slide dimensions of the current Xplain (as shown below).

Add slide objects such as callouts, markers, and animated spotlights.
Record and add audio narration to each of the slides.
Adjust the timing of object animations (such as mouse movement) to match the pace of the audio.
If required (and possibly beyond the scope of simple 'Show Me Demos'), add interactions and links.
Publish the output and embed it within an HTML page or Help+Manual topic.
Limitations of HelpXplain
HelpXplain is not designed to be a full eLearning development tool and therefore is not SCORM compliant, and does not have built-in quiz questions with scoring. However, you could still manually create slides that show a question, and enable users to choose from four possible responses by clicking their chosen answer. You could provide the appropriate feedback, but could not award scores.
Although HelpXplain imports PowerPoint presentations very quickly and effectively, it ignores tables, which are not supported by HelpXplain. Slide animations and transitions are also removed, but you would probably want to set these up in HelpXplain anyway.
There is currently no timeline. The timing of slides is defined by a combination of slide duration, animation order, and timing of each animation. To me, this approach makes sense because the timing of items relative to other items is really all that matters. However, I do expect a timeline to be introduced into a future version of HelpXplain.
It is currently possible for each object to have only a single animation, but I am reliably informed that this restriction will be lifted in the next update of the product.
Some personal highlights of HelpXplain
There are too many aspects of HelpXplain that I really like to list. However, some highlights that I haven't emphasised so far include:
Open and transparent XML-based architecture, with the use of standard HTML and CSS for text formatting.
Option to insert captured screens within custom slide layouts that include supporting text either beside or below the screen.
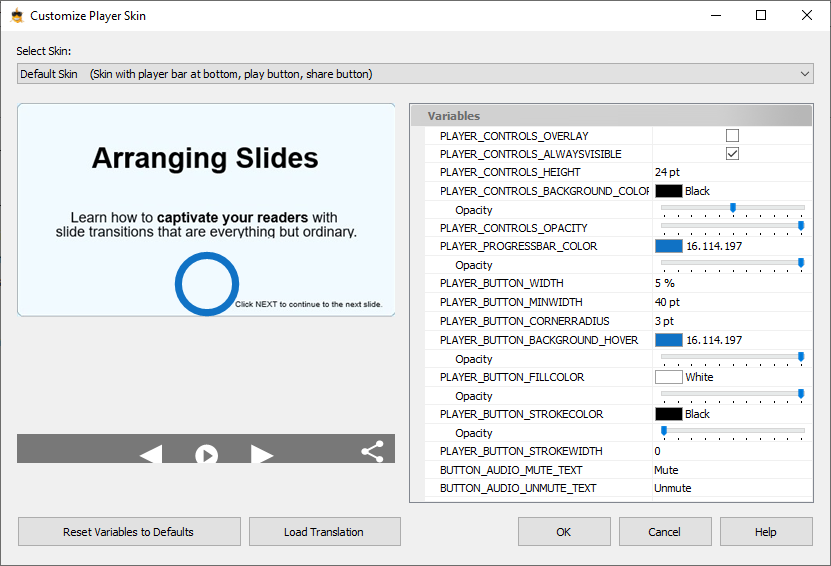
Customisable Players, which are skins within which your slides will be displayed at presentation time (see screenshot below).
Fantastic translation support, which includes being able to export to and import from xliff, the standard XML format used by translators.
More importantly, HelpXplain provides me with a slide-based screencast development tool that includes all the features I need as a technical author for bringing to life step-by-step instructions within a software interface. HelpXplain is also a presentation tool that I would seriously consider using instead of PowerPoint when I need to emphasise relationships or hierarchical concepts
Further reading
TechSmith: What is Screencasting and Why Use it?
Nediger M (2020): What is an Infographic?
Adobe Captivate product website